Monday, December 24, 2012

Merry Christmas to All!

I hope you are having a Merry Christmas, or have had a Merry Christmas, depending on your tradition and your timing of reading this post.  We celebrated Christmas tonight with the kids and their grandparents.  A few days before Christmas, it always feel overwhelming at what is left to prepare, but it always comes together in the end.

I made my own Christmas centerpiece this year for the table, and was pleased by the result.  (Unfortunately, Blogger seems determined to upload this photo rotated, even though it shows up in every other app correctly!!) :

The variegated cedar and variegated holly are from my garden, as are the few branches of our silver-tipped sequoia.  The red berries were from a bush overhanding a back lane (behind a commercial building) just a few blocks away.  The container was from a centerpiece I received from a friend a year or two ago, which I kept & reused.  I would have liked a red candle, but I had only white ones, so I used that.  I've learned not to stress about such little details anymore.

I also updated my neglected front planter for Christmas, but am too lazy to get the other camera and upload a photo.  Another time.

I finally got outside yesterday to wrap up my glass path lights, so they will hopefully survive another winter, and my son came out & had some fun playing with snow while I puttered away.

My poor little fairy house, which has been through a number of winters now, may not make it through this one.  It has lost most of its roofing materials, and is leaning now (Okay, Blogger is being really annoying tonight, with these rotated photos!).

I wish you all a Merry Christmas, and all the best for the New Year!

Tuesday, November 20, 2012

Peaceful Place

I have not been posting many photos of my garden this year, but I have been inspired by Suzy's Artsy-Crafty Sitcom's Photography Challenge to post an entry for next week's theme "Serenity".  I recently emailed myself this photo taken with my mobile phone in my garden about a month ago.  I love this little section of my garden, with the granite bench nestled in amongst the lavender and other perennials.  I didn't notice the evening sun streaming across the photo at the time, but I think it gives it a dreamy look.  I have only edited the photo to add a frame.  I've entitled it "Peaceful Place".

Click the photo for a larger view, and [Esc] to return.

Sunday, October 21, 2012

Yam and Beet Chips

These yam and beet chips are even more delicious than they look, and very easy to make.
This weekend I amused myself by making yam and beet chips.  I was planning just to make kale chips, which I like, but the family doesn't really enjoy.  But then I decided to try something new.
 
I peeled the yams and beets, and sliced them as thin as I could.  Dried them between two paper towels, and laid them out, non-overlapping, on cookie sheets which I had sprayed lightly with oil, and salted.  Then I salted the tops, and placed them in a pre-heated 250 F oven.  When one side was dry, I flipped each over to let the other side dry quicker.  They took a total of 3 hours or so (and some of the thicker beet slices were still not crispy), but the result was very good.  Within a couple of hours, the family had eaten 3 beets and a medium sized yam, in chip form.
 
So I bought more yams and beets today, and made more chips.  This time I concentrated on slicing even thinner, left the beets between the paper towels for a while to become really dry, and the chips were done and very crispy in less than 3 hours.  I didn't take a photo of the yams or beets when first laid out on the pans, but here is a shot as I pulled them out of the oven, when done.  When they dry, they shrink, so I had combined a couple of sheets together as they came close to the end.
I'm not sure what veggies I'll try next.  I was thinking of carrots.  I need to take a look at one of those gourmet veggie chip bags to see what else I should try.
 
Let me know if you try any veggie chips, and what veggies work well.

Sunday, September 23, 2012

Good-bye to our Rattie Girl Sammy

Recently we said good-bye to Jen, and now we have said good-bye to our oldest rattie girl, Sammy.  We found her dead on Tuesday.  She had hung on a very long time, a surprise to us, since she had developed large tumours, and toward the end lost all her beautiful blond colour, and became completely white and then eventually a light grey.  But we still remember her earlier days with her pretty silky blond hair, ruby eyes, and her surprising candy-like scent (none of the other rats smelled sweet like she did).  She was a good friend to Jenny, and to my daughter.  We will miss her.

Monday, September 10, 2012

Good-bye to our girl Jen (and our Bear)

2012 will be a very sad year, especially for my daughter, since we will likely say good-bye to all 4 of our ratties by the end of the year.  They are all at end-of-life.  July 1 we said good-bye to Bear.  We were surprised that he was the first to go.  We had expected Sam, our oldest girl, with her enormous tumours and white hair (she used to be a blond), would be the first one to leave us.  But she is still hanging on.

This weekend, we said good-bye to my girl Jen.  We returned Saturday evening from being out all day, and my daughter found her at the bottom of the cage.  She looked like she was near the end.  So we gave her a soft cloth to lie on, and petted her beautiful little black head to comfort her.  She departed peacefully.  It was still sad.  She is now buried under the plum tree, not far from Bear.

I don't think it will be long for poor Sam.  She is not doing well lately.  Hopefully Archie, our youngest boy, will be with us for some time.  It will be sad when they are all gone, but unfortunately due to my allergies (which I didn't know about until we had all 4 rats), we will not be replacing them.

Here are a few photos of Jen.  She was our sweet little curly girl, with the curly whiskers and fur.  She loved to run (she was fast!), and give my daughter kisses.  She was a good friend to Sammy.
 
Here are also some memories of our gentle and huggable, squeezable Bear, who we thought would be a nice companion for Sammy, until we discovered he was a boy.  I have to admit that his dopey dumbo look never melted my heart, but he was a good friend for my daughter, a favourite of her friends, and a good companion for Archie.


Friday, August 31, 2012

More Glimpses of Europe : Vienna, Venice, and More

We passed through Wien (Vienna), Austria, where we visited and toured the beautiful Schoenbrunn Castle.  Again, photos were not allowed inside the tour, but even these mostly exterior photos hint at the grandeur of the castle :


We stayed three nights in Meste, just a short bus ride from Venezia (Venice), Italy.  Two days in Venezia was not nearly enough to see it all, but we got a pretty good flavour of the city, and visited many interesting shops too.  Here are some of the classic Venice views :
 

The highlight of Venezia for me was the San Marco Piazza.  It was crowded, noisy, the restaurant where we enjoyed sitting on the plaza was too expensive, but the architecture was gorgeous.  These samples don't come close to expressing the many wonderful views :

I really liked this image of Adam and Eve and the serpent in the Garden.  You can see the finger pointing so clearly.  "It wasn't my fault, it was the woman who gave it to me."  "It wasn't my fault, it was the serpent who deceived me."

Finally for today, another beautiful cathedral, the Saint Jacob's Church which we visited in Brno, Czech Republic :

Stay tuned for a few more photos when I next have the opportunity to organize and post.

Thursday, August 30, 2012

Glimpses of Europe : Dragons, Cathedrals, Cobblestones and Castles

Our family had the wonderful privilege to take a 3 week vacation in Europe, returning this past weekend.  It was my first time, as it was for the kids.  We ended up visiting 6 countries, spending a good part of our time in the Czech Republic, where my husband comes from.  I amused myself by taking about 1400 photos during our trip, of which I hope to share a small sampling.

It's hard to know where to start, since there was so much to see.  We visited a number of beautiful cathedrals.  This one is Katedrala Svate Barbory (Cathedral of Saint Barbara) in Kutna Hora, Czech Republic (not far from Praha) :

This one is the Saint Vitus Cathedral in the Prague Castle :

I am fascinated by dragons, so was pleased to see a number of statues and images of dragons, many of them featuring Saint George slaying a dragon.  The dragon at top, who is dismayed that a pigeon is sitting on his nose, is from Klagenfurt, Austria :

I was also amused by the many buildings in the Czech Republic which appeared to be held up by statues, many of them with anguished or strained looks on their faces.  After all, it is heavy work to hold up a stone building :

The timing of the trip was fortunate for me, in that it was eight weeks after my nasty ankle sprain, so I was pretty much back to walking normally, navigating stairs, and mostly without pain.  None too soon, since the walking surfaces were quite challenging, with cobblestones featured in most of the roads and sidewalks in the Czech republic, and even in some of the other countries we visited.  Here is a sampling of some of the surfaces on which we trod :

In the Czech Republic, the castles were classified as either a Hrad (fortress), evoking scenes of great sieges and battles, or a Zamek (chateau), displaying elaborate exterior and interior decor, often with grand formal gardens and collections of unique and now ancient trees.  We visited a number of both types.  To my dismay, the zamek could only be visited by guided tour, and photos were not allowed, so I only have the images in my memory, which make my otherwise grand house seem rather plain in comparison.

The boys preferred the hrads, which usually involved some hiking to access. This is the Hrad Spilberk in Brno, CZ.  It was built in the 13th century, withstood a three month siege by the Swedish army in the 17th century, and has been modified and used as a prison at various stages of its history (for a more extensive historical description, see the Spilberk Castle website).  We walked through the dark, damp and very dreary dungeon which served as prison cells for large groups of prisoners :

I'll share more photos when I next have the opportunity.

Sunday, July 29, 2012

Lavender Harvest

I had the wonderful pleasure of harvesting some of my lavender today, with the bees buzzing about the flowers as I cut them.  I believe the variety growing beside my granite bench is Lavendula "Grosso", since it forms long and sturdy stems, and makes wonderful floral arrangements.  I have other forms of English lavender at the front of my house, which are great for harvesting the flower heads (for potpourri or in various recipes, such as lavender jelly), but don't have nearly as impressive stems or flowers.
Lavender stems and flowers

I also had the wonderful pleasure today of sharing some of my lavender stems and flower heads with my current massage therapist, Maguin, and my former massage therapist, Gael, who I consider a good friend, even if we don't see each other more than once or twice every year.  I often think of Gael when I pass the lavender in my garden, so was happy for the excuse to phone her, and since I was surprisingly "single" tonight (my husband is away on a business trip, and the kids went to stay with their grandma for a few days), we were able to enjoy an evening together of dinner and good conversation.  I hope to see my mom soon, so I can share some lavender with her.  After all, one of the pleasures of having a garden is being able to share the abundance with friends and friends.

Monday, July 23, 2012

Sony NEX5N Garden Photos

Recently we bought a Sony NEX5N camera which is an ultra-small digital SLR camera with some full-size camera capabilities.  Other than its resistance to taking super closeup macro photos (which my little Nikon Coolpix L21 was surprisingly good at), I have been impressed all around with this Sony camera.  The feature which really sold us was the low light capabilities - up to ISO 12800, so it practically takes images in the dark!

This weekend I had my first opportunity to play with the camera, and took a number of photos of my mother-in-law's garden.  I've compiled the results into a few mosaics.  First, just in "normal" modes:
Good camera speed, good focus, good colour.
Then I discovered an effect called "Posterize", which was pretty cool for an in-camera feature, something you would expect to find instead in digital post-processing :
My favourite, though, was a feature by which you could select to see only green, blue, red, or yellow, and the remainder of the photo was in black and white :
Since you actually see the result through the digital display (which also swivels, to handle some extreme camera angles), I wonder if you could use this to help finding lost keys, if you marked your keys with a dot of one of these colours?

Thursday, July 12, 2012

Butchart Gardens in Victoria, BC

In May, my husband and I celebrated our 15th anniversary with a cruise from San Diego, CA back to our home in Vancouver, BC.  We had the wonderful opportunity to spend a day in Victoria BC (which may sound funny but this is a rare occurrence for us, since the trip otherwise involves a lengthy and expensive ferry ride from Vancouver).  We decided to spend part of the day at the world famous Butchart Gardens - my first visit.  Even though it was early in the year, it seemed the entire garden was already in bloom.  Here are a few photos I compiled into mosaics.
Butchart Gardens in Victoria, BC
As you see from the next set, even the garbage bins were in bloom:
Butchart Gardens in Victoria, BC
We spent 3 hours in the garden, and that was barely enough time to make it through all the areas, with me taking photos (I had told myself I would just enjoy it, but it was so photogenic I couldn't help myself).  Another time I would plan for 4 hours.  But as it was, after a stop downtown to visit our two favourite stores, we made it back to the ship just in time to reboard.

Butchart Gardens in Victoria, BC
If you ever have a chance to visit Victoria, this is a visit I would recommend.  As I would a Pacific coastal or Alaska cruise.

As for my recent absence of garden posts, I have actually been quite busy in the garden this, doing some major cleanup and projects.  Most of the time, I have been too busy to stop and take photos.

Then 4 weeks ago, I sprained my ankle while walking through moist grass in our sloped front yard.  I am finally walking almost normally, but I am still slow navigating stairs, and can feel pain or discomfort in my ankle any time the ground is uneven or sloped in any direction.  I'm now back in the garden, but need to be careful not to forget myself, and aggravate it again.

Sunday, April 22, 2012

Skagit Valley Tulip Festival 2012

Skagit Valley Tulip Festival 2012
It has been many years (6 years, actually - see 2006 post) since we last went to the Skagit Valley Tulip Festival in La Conner, WA.  So this Saturday, we rounded up the family and visited again.  It didn't disappoint.  However, this year we didn't pick the large commercialized Tulip Town or Roozengaarde fields, but instead a quieter field, but one with beautifully contrasting swaths of yellow and red.

Here are some more photos that don't do justice to the beautiful colours there:
I loved this muddy ol' truck in the field.  A small group of Mexican workers were gathering armfuls of tulips (presumably the old blooms, although I couldn't see how they were different than any of the other blooms around us) and tossing them onto the truck.  I think it made for a neat photo.
Of course, the real aim of any such visit it to catch some nice photos of the family, especially the kids.  We got our share of our teenage daughter looking grumpy and squinting into the sun, and my son goofing around.  But then there were a couple of gems which made the photographic attempts worthwhile.
It's funny, looking back on these few happy and relaxed photos of the kids, that all of them were in the daffodil field, where we spontaneously pulled over to the side of the road, on our way while driving around to decide on a tulip field.  Once we were actually in the tulip field, it seems all the kids wanted to do was leave.  Reminder to self: Plan for an impromptu photo session prior to the real photo session again next time.

Thursday, April 05, 2012

Forsythia : You Can Grow That!

I received so many encouraging comments on my "You Can Grow That" post about espalier fruit trees last month, that I have been looking forward to joining C.L. Fornari of Whole Life Gardening, in this month's edition of "You Can Grow That".

At first I planned to write about strawberries in the garden, but I may save that for a future post.  Instead, I have been admiring the cheery yellow blooms of forsythia all around the city, and have chosen that for today's topic.

You can grow forsythia, and if you know of any bushes in your area, you can start your own very economically.  Forsythia cuttings can be easily rooted in water.  So all you need to do is clip a twig or two, and set them in a vase.  Soon they will be sprouting and likely will send out roots.  Once the roots are visible, the forsythia can be planted out into the garden, and will quickly grow into a shrub.  I have a forsythia plant behind my compost boxes (see photo below), which was started this way, a couple of years ago.

Although you can cut a flowering twig, and both enjoy the blooms, and then the greenery which will quickly develop, the best time to take a cutting is once the blooms have disappeared, and the plant is directing its energy into growth.  No growth hormones or special treatment are required.
Although the forsythia naturally grows as a floppy bush, it can be trimmed into a hedge, as I see in many yards.  It can also be grown as a standard.  I discovered a wonderful example some years ago while driving, not far from home, and have a photo somewhere of this wonderful forsythia standard in bloom.  I returned the following year to discover that it was gone, replaced by a very small forsythia twig, which the owner appeared to be training in standard form.  I wondered if the wonderful one I had seen had been damaged, and he/she was starting over, or whether it was so beautiful that someone had bought or relocated it.  I never did find out.

I don't know how much work it would be to trim and train it into standard form, but since it grows quite vigorously and is flexible and easy to trim, I don't imagine it would be difficult, if one had patience to wait for the result.  With some diligence at supporting the stem so that it grows straight, trimming away any other stems or lower branches, and trimming the upper branches into a globular shape, but you should be able to grow that, too.  Some day I want to give it a try.  When I'm ready, I can take a cutting from the bush behind my compost bins.

Sunday, March 04, 2012

Espalier Fruit Trees - You Can Grow That!

I was delighted to discover today the first collaborative posting of the monthly "You Can Grow That" blogging meme series, hosted by C.L. Fornari of Whole Life Gardening, and I knew I had to join.  At least this first one.  I don't know how often I'll remember it's the 4th day of the month, or have something I can organize, but I instantly knew what I wanted to share : my espalier fruit trees.

My espalier fruit trees are a continual delight to me, as well as to my garden and garden blog visitors.  All three are in the horizontal cordon espalier form, and all of them feature 3 different varieties of the same fruit, one on each horizontal level.  I have had my apple and asian pear espaliers about 7 years now, in which time their branches have grown from about 1 1/2 feet long to about 8 feet long.  My european pear is quite new, added only 4 years ago.

Here is my apple espalier tree, with a closeup of 2 of the varieties of apples:

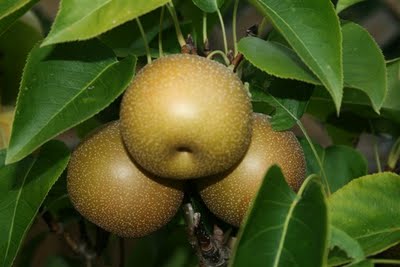
And here is my espalier asian pear, with a closeup of all 3 varieties of asian pears:


For me, the process of planting and getting them set up was an interative approach, but some of the lessons I've learned are :

1. Leave lots of room for horizontal growth of the branches.  I like the look of mine at 8 feet (16 overall), since this is the length of my cedar fence panels.  But I think the branches could easily grow to 12 feet or more, with adequate supports.
2. If you plant against a wall or fence, leave room behind for access.  Mine are planted about 12" from the fence, and this provides good access to reach behind, to trim branches, etc.
3. You don't need a fence behind.  At the UBC Botanical gardens, there are some wonderful examples of espaliers growing beside a path in the food garden, and the espaliers themselves form a fence.  But if you have a fence or wall available, it helps to provide reflective heat for fruit production.
4. Provide adequate supports for the branches.  Mine are a thick vinyl-coated copper wire ( roughly equivalent to a clothesline), tied to landscaping posts through eyelet hooks.  But over time the eyelet hooks are coming loose, so if I re-tied them, I would tie them directly around the posts, and bend a nail over them to keep them from sliding up/down the post.
5. Be diligent in pruning.  Over time you will learn to recognize fruit-bearing spurs (which are compact) and the vertical growth which need to be trimmed back aggressively, to allow the tree to put its energy into fruit rather than branch development.  I prune them at various times during the year, mostly in spring and summer, when the growth is quite vigorous, and needs to be diverted to the fruit.
6. Be diligent in thinning the fruit.  Yes, the fruit is so plentiful, that it needs to be pruned, in order to allow the fruit to develop.  Best not to leave more than one or two per fruiting spur, and not closer than 6" apart.  This is the task I find the hardest, and I tend to leave too much fruit, creating undue strain on the tree, and ending up with fruits that don't ripen as quickly or fully as they could.

But most of all, I've learned with all of my fruit trees :
7. Start now!  Trees are an excellent investment, and grow every year, so if you are thinking about a purchase, don't put it off another year.  Prepare your hole, and head to the nursery!  The best stock arrives (usually bareroot) in late winter/early spring, so it is that time, or soon will be!

PS. Come join in the 4th of each month with your own "You Can Grow That" post, at Whole Life Gardening.
Blog Widget by LinkWithin