Saturday, January 28, 2006

Recipe : Truffle Mice

This is not a garden recipe, but is a great rainy day no-bake recipe, and kids (maybe 5 yrs and up) can even participate. I got it from my friend, Jan, and she got it from the Pied Piper Preschool Cookbook (submitted by Linda Giles).

Truffle mice easy recipeIngredients:
4 oz. semi-sweet chocolate baking square (don't substitute chocolate chips, they don't melt well)

1/3 Cup sour cream
1 Cup chocolate wafer crumbs (Oreo crumbs or finely crushed Christie Chocolate wafers)
1/3 Cup icing sugar, sprinkles or chocolate wafer crumbs (I use the wafer crumbs)
silver ball decorations
almond flakes
thin black licorice ropes (red ones work fine, too)

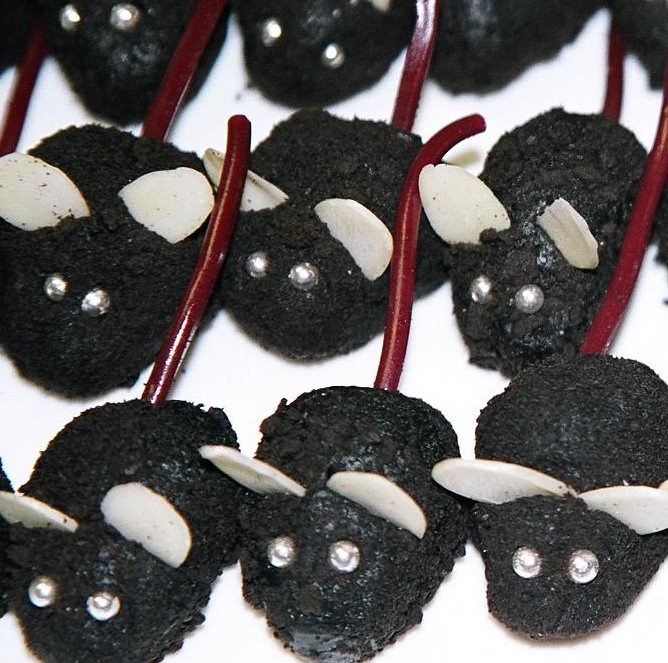
Melt chocolate over hot (not boiling) water and remove from heat. Blend in sour cream and mix well. Stir in 1 cup of wafer crumbs and mix well. Cover and refrigerate until firm, about 1 hour. Roll mixture into 1" balls that are pointed at one end. Roll balls in icing sugar, sprinkles, or if freezing, wafer crumbs.

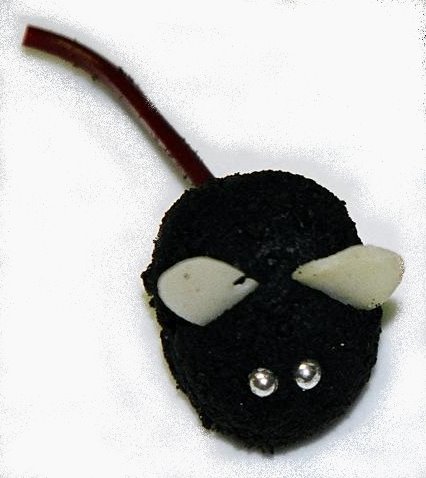
Insert silver balls for eyes and half an almond flake for each ear. Use small slices of licorice for tails.

Refrigerate until firm, about 2 hours. These can be stored in the fridge for about 1 week. Makes about 2 dozen.

Army of truffle mice - a sweet treatThe hardest part of this recipe may be tracking down the licorice ropes. I found mine in the candy section of London Drugs. There were no black ones, only strawberry and grape (which I chose for its darker colour). My daughter thought this was great, since she doesn't like black licorice.

Preparing and assembling the mice is surprisingly easy, and the result is great. If you have young helpers, you may even get some creative variations, such as three-eyed mice and ones with wierd expressions - it's all part of the fun.

Thursday, January 26, 2006

"Purple Peacock" Pole Bean

While dreaming of gardening during the dark of winter, I came upon an amazing plant in the Westcoast Seeds catalog, which I absolutely MUST try this year. It is a purple pole bean called "Purple Peacock". Here is the description and a photo from the catalog:

A beautiful plant - dark purple pods and twining stems, light purple flowers and dark leaves. A very striking and useful screen in the garden. This variety flowers first of all the beans, and handles cool conditions well. Purple pods keep their flavour and tenderness even when very long, turn green when cooked. Sets abundantly.

Okay, purple beans turn green when cooked, and this one is no exception. But this one offers purple stems, dark (presumably green) leaves, and even purple flowers! This is a purple-lover's dream-come-true!! My seven-year-old daughter will surely LOVE this plant! Better yet, Westcoast Seeds, which is a local company in Delta BC, distributes its seeds through my local Gardenworks in Burnaby, so no shipping (or waiting).

I picked up my Purple Peacock seeds today (approx 140 seeds for $3.10), along with a few more which caught my eye, including the swiss chard called Rhubarb Chard. I mistakenly bought a single small plant last year at a garden shop, thinking it was rhubarb. The tag had "Rhubarb" at the top and "Swiss Chard" at the bottom! Well, it provided a beautiful show of red stems all year (even better than the WestCoast Seeds photo at left), and a number of servings of cooked chard also (I harvested only the outer leaves). This year I hope to have more plants, for even more colour and more harvesting. I will likely start some indoors, and direct others outdoors, since I suspect the slugs may enjoy the chard seedlings.

Monday, January 23, 2006

Garden Painting Day 1 : Paper layout

My creative side has gotten the best of me again. We have a large empty wall which has been calling out for a painting or other artwork for over a year now. We've looked, but haven't found anything we've liked which is large enough to suit that wall, and if we ever found it, I'm sure we'd be discouraged by the price. So the joking about painting my own may soon become a reality. Yesterday I started the project.

My first step was to decide on the dimensions of the piece. I cut out a large paper to the 36" x 48" which I had guessed would fit, taped it to the wall, and viewed it from all angles. Yes, it suited that space.

The picture in my mind is one of a mature flower garden, solid with flowers (no soil visible), in orderly patches of colour and texture. The layout will be a real garden on a hillside, so each successive flower rises above the one in front of it. Very much inspired by the garden I am trying to create in my back yard. I want each flower to be identifiable, and large enough to see the flower detail. My thought about creating a stained glass stylized image of the garden was given the thumbs down, so I will work in photo-realism, which is my natural style anyhow.

To layout the garden, I am using many of the flowers from my garden, and using a cut-and-paste of flower images printed from the internet, to get a feel for the composition and colours before I commit to it on canvas. I'll hang it occasionally, to make sure it looks good from a distance as well as close up. The photo shows my progress so far. I will continue to fill in the flowers until I have a layout. It needs a feature, such as a small statue, or basket & clippers, or a cat amid the flowers, but I haven't decided yet. My husband suggests I paint the kids in, but that may be too challenging for my first painting!

When the layout is near completion, I will invest in a set of artists acrylics, and try my hand at a small canvas board painting. If that goes well, I will buy the 36" x 48" canvas, and dive in. I've not given myself any time limit, and wouldn't expect it finished before the end of summer. My biggest challenge may be finding ways to involve the family, so they will allow me to work on it during waking hours, rather than waiting until the kids are in bed (which is my usual tendency). Wish me luck!

Thursday, January 19, 2006

Past Favourites : Osteospermum

We awoke to a light skiff of snow this morning, so maybe there is more winter yet. So while I'm already dreaming about this year's garden, there is time to reminisce about last year's, and some of my "favourites". One that took me by surprise is a light purple osteospermum, apparently from the "Soprano" series. I was given a small rooted shoot of this plant from a gardening friend, Cathy, along with a number of other offsprings and garden extras she was kind enough to share with me.

Although our local garden center sells osteospermums as "annuals", these natives to the cape of South Africa (also known as African Daisies or Cape Daisies) are actually tender perennials, and in Vancouver, continue as a lush evergreen mat in the garden throughout winter. The photo at right shows my osteospermum in early summer (along with a yellow-blooming sedum spathulifolium "Capa Blanca"), having established itself as a small plant on a sunny slope. By the end of the growing season, it had produced a dense mat a full 3' across, with dozens of purple flowers. Each new shoot roots itself as the mat spreads, so it is easy to reach down, clip and share shoots with friends.

What endeared this plant to me is its "moodiness". On overcast days or evenings, the flowers remain closed. Only on sunny days, it opens to reveal the dark purple disk or eye in the center. It makes a good cut flower, and the leaves form a great low-growing groundcover which even the most persistent weeds would not interfere with (alas, I admit to my other interest in this plant!). I have already traded one friend for a dark purple osteospermum, and this year, hope to add a number of other colours to my collection. I encourage you to try it out, too.

A mid-January Jump Start on the Weeds

It is only mid January, but a walk through the garden finds two types of weeds already in flower, in our mild Pacific Northwest climate. While our all-time record-tying 28 consecutive days of rain discouraged me from venturing near the garden, the invasive and unwelcome plants relished the weather along with all my favourites.

The pineapple weed (matricaria matricarioides) - resembling a chamomile flower - is topped in yellow buds. The bittercress (cardamine hirsuta) is putting out tiny white flowers, and has spread to form patches of the green. After donning garden gloves and kneepads, I am ready for battle. Happily, both yield very easily to the side of my plastic hand shovel (trowel), and soon I have a 5 gallon bucket of food for my compost bin. There is much more which can be done in the garden, but I'm DONE (that's my aching body speaking!) for today.

I take a leisurely walk and visit each of my 9 fruit trees, all but one which show signs of life, tiny buds bulging along the bare twigs. Daylilies are just poking through the surface of the soil, the daffodils and tulips and crocuses (or should I say croci?) are evident. One crocus is even in bud - show off! Pretty satisfying for my first day of gardening in 2006. Lots more rain and possibly snow to expect in the next couple of months, but I'm already anticipating the arrival of Spring.
Blog Widget by LinkWithin